
- 284 Views
- 27 Min Read
- (0) Comment
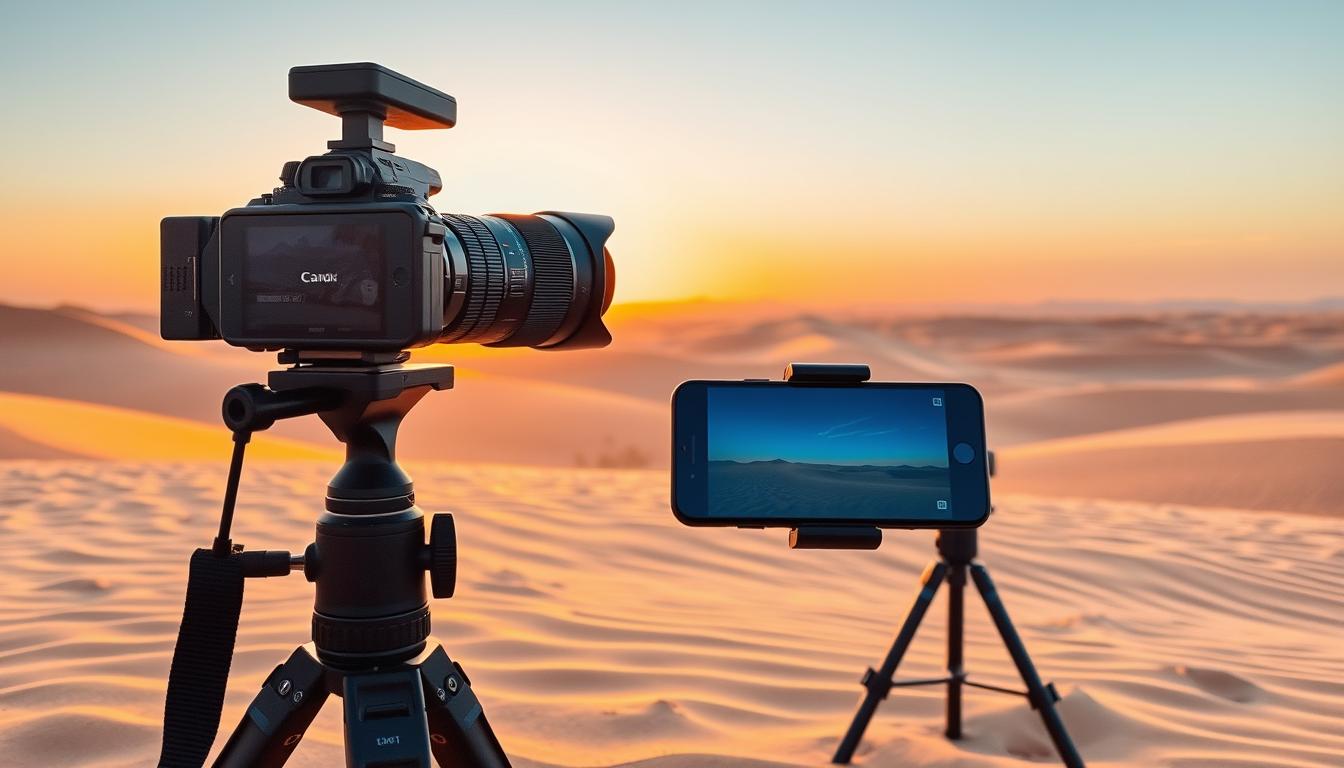
Before the sun rises in Ras Al Khaimah, everything is calm. The cool of the night lingers in the sand, and the sky starts to glow a soft gold. You’re ready with your phone or camera. In that moment, the desert is all you see: its sand, its light, and the endless horizon that makes you take a deep breath. You want to capture every detail, every contour, every color, just as it is.
This guide will help you get your phone and camera ready for desert shots in RAK. It has tips to keep your equipment safe, manage bright light, and make colors look real. No matter if you’re using a smartphone or a professional camera with special RAK gear, you’ll find helpful steps and advice. Plus, you’ll learn which camera settings are best for reducing glare, keeping shadows detailed, and capturing the desert atmosphere clearly.
Think of this as getting ready for an adventure. The plan is to be prepared, take meaningful photos, and come back with pictures that are as good as your memories.
Key Takeaways
- Arrive with a clear plan for light—golden hour and blue hour reward careful timing in RAK.
- Use protective cases, lens cloths, and sealed pouches to guard against sand and heat.
- Dial in camera settings for desert photos to balance bright highlights and deep shadows.
- Pack essential RAK photography equipment that’s reliable, compact, and dust resistant.
- Leverage smartphone photography in RAK with RAW, exposure control, and clean lenses.
- Keep power and storage ready for full-day shoots to avoid missed moments.
- Aim for natural color: expose with intention so sand tones stay warm yet accurate.
Why RAK’s Desert Is a Unique Photography Playground
Ras Al Khaimah is perfect for photographers. Al Wadi’s wind-shaped dunes merge with gravel plains and wadis at the Hajar foothills. This creates layers for amazing shots. Keeping your photography gear light helps you move easily in the desert.
Plan for shifting textures and air clarity. The heat can make far away scenes look blurry by late morning. Capture clear pictures by shooting at low angles in the early morning or late evening. For smartphone cameras, bring a clip-on CPL and a cloth to keep your lens clean.
Golden hour versus blue hour in Ras Al Khaimah
The golden hour makes the dunes look stunning and the shadows deep. It’s perfect for capturing the desert’s tiny details and animal tracks. During the blue hour, you get softer light and beautiful skies over Al Hamra.
Remember to expose pictures for the brightest parts, then adjust the dark areas later. Use Pro or RAW settings on smartphones for the best colors. A small tripod can help in low light.
Contrasting dunes, wadis, and coastal haze
The area near Al Wadi has warm dunes, wadis with rocks, and a mystical coastal haze. Each place needs a special approach. Bring a wide lens for big scenes and a zoom lens for closer looks.
- For dunes: low angles to stretch ripples and emphasize scale.
- For wadis: use foreground stones to anchor the frame.
- For haze: embrace atmospheric depth for mood and scale.
Challenges of heat, sand, and high contrast light
UV rays and sand reflection can make photography hard. Using filters can protect your shots from too much light. Keep your equipment safe from dust and water with protective gear.
In winter, coming out of an air-con car can fog up your lens. Keep them in bags to adjust slowly. For smartphones, use a protective case. These tips and the right gear will keep you prepared for those perfect light moments.
How to Prepare Your Phone & Camera for Desert Photography in RAK
Planning your kit with the terrain and light in mind gives you better results. Follow this guide on How to Prepare Your Phone & Camera for Desert Photography in RAK. Ensure your equipment is minimal, dust-proof, and ready for dawn and dusk shots in the desert.
Pre-trip checklist for phones and cameras
- Update firmware on devices like Apple iPhone, Google Pixel, Samsung Galaxy, and cameras from Sony, Canon, Nikon, and Fujifilm. Turn on RAW or ProRAW/RAW+JPEG settings to keep details in bright sands.
- Sync time and GPS to make geotagging across devices accurate. This aligns your camera settings with your phone logs for desert photos.
- Clean your gear with a rocket blower and microfiber cloths. Use pre-cut sensor swabs if you know how. Make sure lenses and filters are dust-free before packing.
- Set custom modes for shooting dunes: one for action and another for landscapes. Save white balance presets for the desert’s warm sand and cool skies.
Power, storage, and protection planning
- Fully charge your batteries and bring a 20,000–30,000 mAh USB‑C PD power bank. A 12V car charger keeps your gear ready during rides between dunes.
- Have several UHS‑I/II SD or CFexpress cards (128–256 GB each). For phones, carry fast USB‑C external SSDs for extra storage and quick file transfers.
- Guard against dust with weather‑sealed body and lens pairs or rain covers. Use lens filters, dry bags, and silica gel packs for extra protection. A compact sling keeps your equipment secure on rough rides.
- Develop a routine to check gear: caps on, zippers closed, batteries full, and cards labeled. This avoids last-minute stress and keeps your settings ready for desert shots.
Coordinating gear with dune buggy and safari schedules
- Choose lenses wisely: wide angles for broad landscapes at dawn, telephoto for action shots later. This is key for successful desert photography in RAK.
- Talk to Desert Buggy Rental Dubai about the type of service—Dune Buggy Tours, Quad Biking Tours, or Desert Safaris—and pack gear accordingly.
- Before departure, secure straps and quick‑release plates. Keep a camera ready and an extra lens safe in your bag.
- Plan for the golden and blue hours. Contact the team for 24‑hour scheduling at +971 52 440 9525 or [email protected]. This helps match your photo settings to the light.
Tip: Do a five‑minute trial run at home—change batteries, swap cards, and clean lenses. This prepares you for the challenges of wind and sand.
Smartphone Photography in RAK: Setup and Pro Tips
RAK’s dunes ask for fast setup and neat technique. In smartphone photography in RAK, stick to simple, repeatable moves. This approach lets you quickly adapt as the light changes and riders make new tracks.
Enable RAW/Pro mode and control exposure
On an iPhone, turn on ProRAW. For Google Pixel, activate RAW+. On a Samsung Galaxy, select Expert RAW or Pro mode. Shooting in RAW improves dynamic range and editing freedom.
Adjust exposure to protect light details. Aim for well-exposed sand and sky colors. Fix exposure settings to avoid changes when action happens. Use low ISO and adjust shutter speed for movement.
Use focus peaking and manual focus where available
If your phone allows, activate focus peaking with Samsung Expert RAW or apps like ProCam X. Manual focus captures sharp dune and skyline details smoothly.
For still scenes, focus on the dune top early. For moving subjects, pick a focus point and wait for the action. Clean your lens to prevent dust from blurring your shots.
Leveraging ultra-wide and telephoto lenses
Use the ultra-wide lens for broad views and dramatic perspectives. Make sure the horizon is straight and minimize stretching at the edges. Switch to a telephoto lens for distant subjects or to highlight shapes.
When light fades, steady your phone and use rapid-fire shots to keep images sharp. For wide shots, stitch together vertical pictures carefully to avoid errors.
| Brand/Mode | RAW Option | Key Controls | Use Case in RAK |
|---|---|---|---|
| Apple iPhone | ProRAW | EV, AE/AF Lock | Bright dunes with colorful skies; balanced camera settings for desert photos |
| Google Pixel | RAW+ | EV, Tap-to-Expose | Quick street-to-sand switch; fast edits with reliable dynamic range |
| Samsung Galaxy | Expert RAW / Pro | Manual focus, focus peaking, EV | Edge-sharp ridges, silhouettes, and precise control for smartphone photography in RAK |
| Lens Choice | Ultra-wide / Telephoto | Optical zoom, horizon level | Wide for sweeping vistas; telephoto for compressed layers and action detail |
| Stability | Tripod / Vehicle Brace | Burst mode, low ISO | Clean motion at dusk; reliable results guided by desert photography tips |
Essential RAK Photography Equipment for the Desert
When you’re setting up your kit, pick items that can handle the heat, wind, and sand. Look for cameras and lenses that are weather-sealed. Keep your gear light for easy carrying. It’s also important to choose equipment that you can use quickly on shifting sands. With the right tools and skills, you can make the most of the tough light conditions in the desert.
Camera bodies and lenses that thrive in sand
Go for cameras that are sealed against the elements, like the Canon EOS R6 Mark II, Nikon Z6 II, Sony a7 IV, or Fujifilm X-T5. Match these with lenses that also keep dust away, such as Canon RF L, Nikon Z S-Line, Sony G/GM, and Fujifilm WR.
A set of just two lenses can give you a lot of flexibility: a zoom lens for wide or standard shots (like 15–35mm, 16–35mm, or 17–28mm) and a telephoto lens for reaching far (70–200mm or 70–180mm). Include fast prime lenses, such as a 24mm and an 85mm, for clear images and great shots in low light. These choices follow well-established advice for desert photography.
Filters: CPL, ND, and graduated ND for harsh light
Use a circular polarizer filter to cut down glare from the sand and make the sky look deeper blue. But be careful with it on super wide shots to avoid making the sky look uneven. Neutral-density filters, around 3 to 6 stops, allow you to create blur effects with moving sand or clouds, even under strong sunlight.
Graduated ND filters help to balance bright skies with darker ground, maintaining details in both light and shadow. With the proper equipment, these filters can help you manage contrast, ensuring your photos have true-to-life colors.
Tripods, straps, and stabilization for dunes
Choose a tripod made of carbon fiber, which is light yet stable on sand, and make sure it has spiked feet. A good ball head keeps things steady. Carry your camera across your body using a reliable strap, like those from Peak Design Slide or BlackRapid, especially when you’re moving quickly or on buggies.
Having your camera and lenses stabilized is crucial for clear images as the day ends. For videos taken with your phone, a compact gimbal can improve quality. Remember, sticking to proven techniques for desert photography helps keep your shots sharp, even in windy conditions.
| Category | Recommended Options | Why It Works in RAK | Practical Tip |
|---|---|---|---|
| Camera Bodies | Canon EOS R6 Mark II, Nikon Z6 II, Sony a7 IV, Fujifilm X-T5 | Weather sealing resists dust; strong autofocus for moving subjects | Carry a blower and keep the body powered off during lens swaps |
| Lenses | 15–35/16–35/17–28 zoom; 70–200 or 70–180; 24mm and 85mm primes | Covers vistas and distant ridgelines; fast primes for low light | Use sealed lines: RF L, Z S-Line, G/GM, WR to reduce dust entry |
| Filters | CPL, ND 3–6 stops, Graduated ND | Controls glare and contrast; enables motion blur in harsh sun | Feather grad edges; ease off CPL on ultra-wide shots |
| Support | Carbon-fiber tripod with spikes; compact ball head | Stable on soft sand; light for long walks over dunes | Push legs deep and hang a bag for extra weight if winds rise |
| Carry & Stabilization | Peak Design Slide, BlackRapid; IBIS and lens IS; phone gimbal | Secure transport on buggies; smooth shots at dusk | Adjust strap length for quick draw; balance gimbal before recording |
Use this framework to match RAK photography equipment with practical desert photography tips and repeatable desert photography techniques that suit your style.
Camera Settings for Desert Photos: Exposure, White Balance, and Focus
The desert’s bright light and quick action challenge photographers. Use careful camera settings to capture detailed desert photos. These tips are also great for smartphone photos in Ras Al Khaimah (RAK) using Pro controls.
Balancing highlights and shadows in bright sun
Shoot in RAW for the best image quality. Use highlight-weighted metering or reduce exposure slightly to keep the bright areas detailed. Activate zebra warnings or highlight alerts to monitor the brightest parts.
Start with low ISO and mid-range aperture in bright sun for sharp images. Change shutter speed according to the scene. For windy conditions, a quick shutter captures sand in air; a slower one adds movement. Use Pro mode for better control in smartphone photography.
Custom white balance for warm sand tones
Set custom white balance for accurate colors. Use a gray card or adjust the Kelvin setting. Around sunrise or sunset, choose 5600-6500K for warm sand tones without too much orange. During blue hour, 3200-4200K captures the cool hues perfectly.
When shooting in mixed light, experiment with Kelvin settings and check the results. This prevents unwanted color casts that dull the image. On smartphones, use the manual white balance slider and create presets for consistency.
Back-button focus and tracking moving subjects
Use back-button focus for precise control. Choose continuous autofocus and subject tracking for moving targets. This works great for fast-moving scenes in the desert.
For a motion blur effect, use a slower shutter and follow the subject smoothly. Use burst mode to increase your chances of a good shot. On smartphones, try burst or motion mode and focus ahead of the action. With these camera settings, you’ll capture the desert’s beauty and action flawlessly.
Desert Photography Techniques to Elevate Your Shots
Turn Ras Al Khaimah’s dunes into vivid visual stories with some key desert photography tips. These ideas work well whether you’re using a high-tech camera or just your phone in RAK.
Leading lines, textures, and minimalist compositions
Stand on a ridge and make the dune’s curve guide your shot. Shooting from a low point brings out the details and depth. Use open spaces in your photo to highlight interesting subjects like a camel or footprints.
To get clear shots, stay on the windward side. Move carefully to not leave your tracks. These methods are great with wide lenses and smart framing for a well-balanced photo.
Silhouettes, sunstars, and lens flare control
To capture silhouettes, adjust your camera to focus on the sky and position your subject against a clear horizon. During the golden hour, adjust your settings to capture beautiful sunstars. You can also reduce glare by positioning the sun just behind a dune.
Always use a lens hood and keep your lens clean for the best shots. Using a CPL filter carefully can reduce glare but be mindful of sky effects. These tips will help maintain vibrant colors and clear contrast.
Action shots of dune buggies and sandboarding
Focus ahead where you anticipate action and capture the moment with rapid shots. Combine different angles and positions for a dynamic series.
Make sure you have enough space for unexpected moves. Capture dynamic actions like sand flying for a sense of motion. Using burst mode and a steady hand helps get clear photos on your phone.
| Scenario | Framing Move | Exposure Tip | Focus Method | Pro Detail |
|---|---|---|---|---|
| Curving dune lines | Stand on the ridge; lead lines from corner to subject | Expose for highlights to preserve sand detail | Single-point AF on mid-frame anchor | Low angle emphasizes ripple texture and depth |
| Minimalist subject | Use negative space to isolate the subject | Dial slight exposure compensation to keep sky clean | Tap-to-focus for precise placement | Crop to 4:5 or 16:9 to strengthen simplicity |
| Silhouette at sunset | Place subject on crest against open sky | Meter the sky; stop down to f/16–f/22 for sunstar | Manual focus at hyperfocal distance | Partially hide sun behind dune to control flare |
| Dune buggy pass | Head-on and side pan from safe offset | Fast shutter to freeze, slower for motion blur | Pre-focus on sand marker and track | Frame wide to keep riders in during sudden turns |
| Sandboarding run | Elevated ridge for S-curve descent | Expose for highlights; protect bright sand | Continuous AF with burst shooting | Catch the rooster tail for energy and scale |
Protecting Your Gear from Heat, Sand, and Dust
Fine sand and fierce sun can quickly spoil a shoot. With suitable RAK photography gear, wise packing, and a few desert photography tips, you can safeguard your equipment. Align your protection strategy with the camera settings for desert shots. This ensures every change and setup is secure.
Weather sealing, rain covers, and dry bags
- Even if your gear is weather-sealed, use a Think Tank or LensCoat cover to stop sand. It helps keep sand from getting into the nooks of your gear.
- When moving, keep your gear in a roll-top dry bag with silica gel packs. It helps block dust and manages moisture inside your photography kit.
- Be cautious when changing lenses. Do it inside a vehicle or a big zip bag, pointing the mount down to keep dust off the sensor.
Sensor and lens cleaning in the field
- Bring a bulb blower, a soft brush, and lens wipes for cleaning. These items are crucial for cleaning when the wind picks up.
- Don’t use cotton swabs on sensors unless you know how. Instead, use special swabs and fluid in a clean room at your base.
- For phones, protect them with a tough case. Use one that has port covers, a lens cap, and a screen protector against sand scratches.
Heat management and condensation prevention
- Protect your equipment from overheating with a white cloth or reflective wrap. And avoid leaving cameras in direct sunlight, like on a car dashboard.
- Let your cameras adjust to temperature differences slowly to prevent fogging. Seal them in a bag for a bit when moving from cool to hot places.
- Keep batteries cool to prevent damage and extend their life. Store them separately in a shaded spot and monitor their temperature closely.
Mix smart handling with protective steps. Maintain dust prevention measures and manage temperature changes well. Doing this ensures your desert photography efforts succeed, especially when conditions change.
Power and Storage Strategy for Full-Day Shoots
Long hours and harsh light await in Ras Al Khaimah, making power planning essential. Mirrorless cameras may need 3–5 batteries for all-day shooting. For smartphone photography in RAK, a 20,000–30,000 mAh PD power bank is key, along with short, dust-resistant USB-C cables. Use a dual USB-C wall charger to charge everything overnight, and have a car adapter ready for driving between locations.
Spread out the risk with your storage media. Carry several 128–256 GB SD or CFexpress cards and use them in rotation throughout the day. Make two backups: one at lunch and one after sunset, using a durable SSD like the SanDisk Extreme Portable or Samsung T7 Shield. This strategy avoids losing all your photos if one card fails.
For phone shooters, transfer RAW files to the SSD via OTG before evening shoots to clear up space. Mark batteries and memory cards for quick swaps in dim lighting. Have a small bag attached to your outfit or main bag for easy access; it should contain fresh batteries, new cards, a microfiber cloth, and your power bank. These are vital RAK photography equipment pieces for quick reaching.
Combine your setup with basic field needs like shade, water, and gadget safeguarding. This ensures your power and storage needs won’t slow you down. For more insights on managing your gear and energy in the sand, check out this guide on planning a desert photo session.
| Item | Recommended Specs | Field Use | Why It Matters |
|---|---|---|---|
| Camera Batteries | 3–5 OEM or high-quality cells | Rotate per segment: dawn, late morning, golden hour, blue hour | Prevents downtime; supports bracketing and burst work |
| Power Bank | 20,000–30,000 mAh with 30–65W PD | Charges phone and USB‑C cameras on location | Essential for smartphone photography in RAK and hybrid kits |
| Chargers | Dual USB‑C wall charger + PD car adapter | Overnight top-up; in-vehicle boosts between dunes | Keeps workflows continuous across a full-day itinerary |
| Memory Cards | Multiple 128–256 GB SD/CFexpress, labeled | Card rotation per scene or hour | Reduces data loss risk; speeds swaps in low light |
| Rugged SSD | SanDisk Extreme Portable or Samsung T7 Shield | Lunch and post-sunset backups via laptop or OTG | Two-copy safety net for critical desert work |
| Cables | Short, dust-resistant USB‑C and Lightning | Quick charging and OTG transfers | Less snagging in wind; better reliability in sand |
| Field Pouch | Clip-on with zip and dividers | Holds batteries, cards, cloth, power bank | Fast access on buggies; protects RAK photography equipment |
Optimizing Color and Detail in Post-Processing
You got strong files in RAK; now it’s time to refine them with smart edits. Start with your camera’s desert settings as a foundation. Keep images looking natural, using desert photo techniques on every edit, no matter if you’re on a phone or laptop.
Mobile editing apps versus desktop workflows
When you’re on the move, try Adobe Lightroom Mobile, Snapseed, or Darkroom for quick fixes. They’re perfect for smartphone shots in RAK, especially for quick sharing while keeping details sharp.
Working from a desk? Adobe Lightroom Classic, Capture One, and DxO PhotoLab offer more control. They let you edit many photos at once, keeping tone and contrast the same throughout.
Desert-specific color grading for natural sand hues
Start with a neutral profile, then carefully lift shadows to dodge noise. Dimming highlights can bring back sky details. For real-looking sand, turn the white balance a bit warmer.
Adjust colors gently with HSL: dial down orange saturation, boost luminance for a soft glow, and tweak sky blues and cyans. Local masks can bring out sky and dune shapes, true to desert photography styles.
Dehaze, texture, and selective contrast techniques
Use Dehaze to clear up haze but keep some mood. Add Texture and a touch of Clarity on details like ripples, but don’t overdo it on faces or skies.
Adding selective contrast can draw the eye. A slight boost in midtones enhances patterns without losing subtleties. For better edges in smartphone photos from RAK, fix distortion and color fringing in RAW.
- Export: Share high-resolution JPEGs in sRGB for online and social use; save 16-bit TIFFs for prints.
- Consistency: For series shots and wide views, make sure color and light look the same in all photos.
- Foundation: Check your desert photo settings on your camera if you see too much bright light; smarter shooting helps with editing.
Planning Your Shoot with Desert Buggy Rental Dubai
With tight planning and clear goals, your outing can become awesome. Remember to balance creativity with safety. Also, think about desert photography tips that suit the terrain. And don’t forget to check out How to Prepare Your Phone & Camera for Desert Photography in RAK. This will help you and your crew get ready.
Best times and routes for golden dunes
To get the best light, book your trip for early morning or late afternoon. Look for spots near Al Wadi for great views. And ask to stop on certain slopes to avoid footprints in your shots.
Bring photography tricks for the changing light: use bracketing, silhouettes, and shadows. Make sure your techniques match what’s in How to Prepare Your Phone & Camera for Desert Photography in RAK. This way, you’ll handle your equipment right and get great shots.
Coordinating with Dune Buggy, Quad Biking, and Safaris
Pick the right adventure for your photos. Dune Buggy and Quad Biking are great for action shots. Morning Safaris show off the desert’s texture, and Evening Safaris give you beautiful silhouettes. A Desert BBQ Dinner or Camel Ride will add special moments to your collection.
- Share a detailed plan: silhouettes, action sequences, and minimalist dunes.
- Ask guides to time stops at safe pull-offs with high ridges.
- Secure every camera with straps and mounts; fix action cams before rollout.
Combine these plans with tips on pacing, hydration, and checking your gear. This helps everyone in your group stay on the same page. You’ll capture the desert without feeling rushed.
Contact: +971 52 440 9525 | [email protected] | 24 hours
If you need to book, get route tips, or any other help, reach out to Desert Buggy Rental Dubai. Their number is +971 52 440 9525, or email [email protected]. They can help confirm your plans, safety tips, and routes. And remember How to Prepare Your Phone & Camera for Desert Photography in RAK for the best shots.
Safety, Etiquette, and Environmental Considerations
Always protect yourself first so you can look after your photos. Keep clear from moving vehicles like buggies and bikes. Stick to the marked paths unless your guide says otherwise. Don’t go over a dune if you can’t see the other side. Wear a hat, use sunscreen, and put on UV sunglasses. Drink plenty of water and bring electrolyte tablets for the heat. These steps help you stay sharp and take better desert photos.
Decide where you’ll stand before starting your shoot. Let your guide know your position, movement plan, and signals. Follow existing vehicle tracks for action shots to avoid harming the environment. At night, use a red light to save your night vision and protect wildlife. This approach works well whether you’re using a smartphone or professional gear in RAK.
Show respect for both people and nature. Always get permission before taking someone’s photo. If they say no, respect their wishes. Don’t step on fragile plants and take all your trash with you. Keep your cleaning sprays away from the sand. Clean your equipment in your car or a sheltered area. This way, your gear lasts longer.
Managing heat is key to safety. Keep your batteries cool and switch camera bodies to avoid overheating. Clean your equipment with a microfiber cloth and use a rocket blower. Never use canned air as it can push dirt into your camera. Follow UAE laws and the rules of any protected areas. Being careful and communicating clearly will make your desert shoots safer and better.
Conclusion
You now understand how to get your phone and camera ready for taking pictures in the desert of RAK. Make sure you pack gear to protect them, seal your lenses tightly, and bring enough power and storage. This way, you can enjoy taking pictures all day without worry. Adjust your camera settings carefully to capture the desert’s bright dunes and vibrant colors accurately.
Plan to take pictures during the golden and blue hours for softer contrast and longer shadows. Use clear framing, leading lines, and simple horizons to improve your desert photos. Keep your edits focused—lightly remove haze, add just enough contrast, and tweak the white balance slightly. This helps keep the natural colors and sharp textures.
For safe and easy access, link up with Desert Buggy Rental Dubai. They offer Dune Buggy Tours, Quad Biking, safaris, Camel Rides, and sandboarding. Plan to capture the sunrise from ridgelines and the evening light from the bowls. Adjust your camera to catch fast action or create smooth motion. For hassle-free planning and 24-hour bookings, call +971 52 440 9525 or email [email protected]. They can help make your shoot ready for a portfolio.
Always show respect for the environment, follow the local rules, and be gentle on the land. With the right preparation and techniques, your pictures will beautifully show the real essence of Ras Al Khaimah. They’ll be sharp, well-balanced, and true to the unique desert light.
FAQ
What are the best times to shoot desert photos in Ras Al Khaimah?
Aim for the golden hour to capture beautiful sand tones and clear textures. This is the first hour after sunrise and the last before sunset. The blue hour, right before sunrise and after sunset, offers gentle contrasts and soft sky colors, perfect for silhouettes. During midday, light can be too strong. Use a CPL or graduated ND filter to manage the light, and plan for heat shimmer if shooting then.
How should you set up your smartphone for desert photography in RAK?
Turn on RAW settings like iPhone ProRAW or Google Pixel RAW+. Lock AE/AF to keep exposure consistent. Lower exposure to protect bright areas, and keep ISO low for clear shots. Use burst mode for fast action, and steady your phone on a tripod or buggy frame in low light. Always clean your lenses to avoid dust and haze.
What camera settings work best for bright desert scenes?
Always shoot in RAW, starting with ISO 100 and f/8–f/11 for a nice depth of field. Use highlight-weighted metering or reduce exposure slightly to prevent overexposure. Keep an eye on zebras or highlight alerts. For warm tones, set custom white balance between 5600–6500K during golden hour. Use cooler settings, 3200–4200K, during blue hour for a refreshing vibe. Track moving subjects with continuous autofocus and back-button focusing.
Which lenses and filters should you pack for dunes and wadis?
Bring a weather-sealed wide or standard zoom lens, and a telephoto lens for landscape and action shots. Include fast primes like a 24mm or 85mm for shots in low light. A CPL filter will reduce glare, and ND filters can help create motion blur. Use a graduated ND filter to balance bright skies with darker landscape.
How do you protect gear from sand, heat, and dust on dune buggies?
Choose weather-sealed cameras and lenses and cover them with a dust cover. Store gear in a dry bag with silica gel to protect from sand. Change lenses in a vehicle or bag to keep dust out. Shade equipment during breaks and avoid leaving it in direct sunlight. Let your gear adjust to temperature changes in a sealed bag to prevent condensation.
What power and storage plan do you need for a full day in the desert?
Bring multiple camera batteries and a large USB-C PD power bank. Also, a car charger is essential. Use several high-capacity SD or CFexpress cards and back up files to a rugged SSD. Make sure to have backups on both cards and SSD for safety.
How can you coordinate photography with Desert Buggy Rental Dubai?
Reserve early or late slots for the best light and clean sand. Share your photo ideas with them and ask for breaks for the best shots. Choose from various tours like Dune Buggy and Quad Biking for action or Desert Safari for unique landscapes. You can also try camel riding. Contact them at +971 52 440 9525 or [email protected], anytime.
What are the top desert photography techniques for dramatic images?
Find leading lines along dune ridges to draw viewers in. Shoot from low angles to make sand patterns stand out. Use the vast empty spaces creatively for a bold look. Capture silhouettes by setting your exposure for the sky and positioning subjects against the horizon. Create sun stars by partially hiding the sun at smaller apertures. For moving subjects, pre-focus and capture them in high-speed bursts to get perfect action shots. Try side panning at slower shutter speeds for a motion blur effect.
Any tips for smartphone photography in RAK when light gets low?
Switch your phone to Pro mode and keep ISO low for the best quality. Use a tripod and timer or remote shutter to avoid blur. If it’s getting really dark, shoot multiple times in burst mode to increase your chances of a sharp photo. Consider using a gimbal for smooth video captures across the sand.
How do you optimize color and detail in post-processing for desert shots?
Start with a neutral setting in your editing software. Adjust highlights carefully and lift shadows for more detail. Warm up white balance just a bit for natural sand tones. Tweak the HSL options to make the orange less intense and the sand more radiant. Use the Dehaze tool carefully for clear shots and apply Texture/Clarity selectively to emphasize sand patterns while keeping skies smooth.
What stabilization and support work best on sand?
A light tripod with spiked feet works well on sand. Keep your camera safe with a cross-body strap. Use in-built stabilization for sharp images at dusk. For phones, a gimbal can help with smooth videos and a clamp mount for steady shots in low light.
Are there safety and etiquette rules you should follow while shooting?
Stay safe away from moving vehicles and blind dune crests. Drink water and use sun protection always. Be respectful and ask before taking photos of people. Avoid damaging plants and take trash with you. At night, use red lights to see without disturbing wildlife. Always follow local laws and the rules of the area you’re in.
What RAK photography equipment maintenance should you do in the field?
Keep a blower, brush, and lens wipes handy for cleaning. Clean your filters to reduce lens flare. Only clean camera sensors with the right tools in a clean area. For smartphones, use port covers and a screen protector to avoid damages.
What are recommended camera settings for action shots of dune buggies?
Set your shutter speed high, around 1/1000–1/2000 sec, and aperture around f/4–f/5.6. Keep ISO as low as you can. Use continuous autofocus with subject tracking for clear shots of fast-moving dune buggies. For a sense of speed, slow down the shutter and pan smoothly with your subject. Leave some extra space in your frame for unexpected movements.
How do you avoid uneven polarization in the desert sky?
Use your polarizer carefully on wide-angle lenses. Adjust it to reduce sand glare without altering the sky too much. If you see the sky’s color start to band, dial back the effect or use a longer lens to even it out.
Categories
- dirt bike (4)
- Uncategorized (4)
- Desert Buggy Rental (2,218)
- Dune buggy (4)
- Quad Bike Rental (1)
- Desert safari (1)
- Hot air ballon (2)
Recent Post


Tags
Arabian adventure ATV License Requirements Ballooning Velocity Balloon ride positions best desert safari in dubai BF dune buggy cost Camel ride apparel tips Children activities in the Dubai desert Cost of dune bashing in Dubai Cost of living in Dubai and Abu Dhabi Customary tipping in ballooning Desert activities timeline Desert Adventure Dubai Desert clothing Desert hiking shoes Desert hot air balloon experience Desert Safari Limitations Desert survival tips Dress recommendations for Dubai Safari Park Dubai desert excursion prices Dubai desert tour expenses Dubai excursions for families Dubai trip cost breakdown Dune buggy rental costs Exploring Dubai's deserts Footwear options in Dubai Fremen Society Hot air balloon adventure Dubai Hot air balloon regulations Hot Air Balloons Jebel Ali Desert Middle Eastern Excursions Minimum age for buggy rides in Dubai Modest clothing for women Number of Riders in Dune Buggy ot air balloon dubai booking Passenger Weight Checks Religious tolerance in Dubai Standard vs Deluxe Toddler mobility options Top speed records Travel Comparison Unexpected Motion Sickness UTV safety comparison Vestibular system